

Overview
Rambling
I like this new Microsoft. Not only are they open sourcing more components, taking pull requests, and contributing upstream, they’re doing a great job reaching out and interacting with the community.
In the past year or so, I went from occasionally throwing code on GitHub, to collaborating on open source projects, sharing what I learned, and somehow having a fun project of mine appear in a few sessions on release pipelines.
I owe much of this to Sergei V. and Michael G., two Microsoftees who helped motivate and prod me (and others) along the way.
This post is a follow up to the series on GitHub, Pester, and AppVeyor, and the post on building PowerShell modules. We’re going to wrap up the module writing process and demonstrate how to automatically deploy your modules to the PowerShell Gallery.
Why Continuous Deployment for Modules?
The importance of writing modules is covered here. This misses a few pieces of the puzzle though: now that we have a module up on GitHub and published to the gallery, we’re not quite done. If we want to reap some of the benefits of open source, we need to make it easy to pull in suggestions from helpful folks on the Internet.
For those of you writing modules, how often have you taken a pull request or committed a change, thinking I’ll get around to publishing this on the PowerShell gallery later? Publishing to the gallery is fairly painless, but it’s another thing to do and to remember. We’re all human, so we occasionally forget, or get lazy and skip that step.
You might even add those extra steps to your calculation of how long it will take to integrate someone’s suggestions. I’ll have to merge that in, and do a bunch of things afterwards to publish it, I’ll just tackle it all some other time.
Having a pipeline to automatically test and deploy our changes can remove the barriers that might dissuade us from these changes. It’s also a great learning opportunity for CI/CD ideas that you could apply to your infrastructure.
So! Where do we start?
The Ingredients
Let’s look at the ingredients for a recipe that gives us continuous deployment for a PowerShell module. We’ll use content from PSDeploy itself as an example:
- A module built roughly following this guide
- A GitHub account
- An AppVeyor account (sign in with GitHub)
- A PowerShell gallery account
- Your PowerShell gallery key, encrypted by AppVeyor
- appveyor.yml. This tells AppVeyor what to run when you make a change to your module
- Build.ps1. This is a simple script to pull in dependencies and kick off psake, which does the real work
- psake.ps1. This organizes your build into “tasks”. It runs your tests and deployments
- deploy.psdeploy.ps1. This tells PSDeploy how to deploy your project - in this case, publishing a module
Let’s put these together!
The Recipe
Let’s boil this down into a few steps:
- Create your module
- Sign up for AppVeyor and PowerShellGallery.com
- Add scaffolding for a release pipeline
- Profit
That’s it! Once you get your module set up from the previous article, you can just layer a little scaffolding on top to automatically publish to the PowerShell gallery.
Following the Recipe
AppVeyor and PowerShell Gallery
So! You should already have a GitHub account. We need two more accounts:
- Register at PowerShellGallery.com. Sign in
- Copy your PowerShell Gallery API key from your account page. Keep this key a secret
- Sign in to AppVeyor with your GitHub account
- Create a secure variable: Click your AppVeyor account drop down, Encrypt data. Paste in your API key and Encrypt! Copy out the resulting encrypted value
Note that GitLab CI and other build systems often have ways to inject secure data like this.
That’s it for the GUI stuff, it’s time to dive into some PowerShell!
Release Pipeline Scaffolding
We’re going to use the following components for our release pipeline:
- AppVeyor.yml. Instructions for AppVeyor. We’ll still use this, but we’ll try to move as much of the build as possible into PowerShell tooling that will work in other build systems.
- Build.ps1. A build script that sets up our dependencies and kicks off psake. Portable across build systems. We install and use a few dependencies:
- BuildHelpers. A module to help with portability and some common build needs
- Psake. A build automation tool. Lets us define a series of tasks for our build
- Pester. A testing framework for PowerShell
- PSDeploy. A module to simplify PowerShell based deployments - Modules, in this case
- Psake.ps1. Tasks to run - testing, build (e.g. bump version number), and deployment to the PowerShell gallery
- deploy.psdeploy.ps1. Instructions that tell PSDeploy how to deploy our module
This combination meets two goals:
- It’s generalized and can be dropped into a new project
- Outside of adding a build-system-config that kicks off build.ps1, it can be used on build systems like Jenkins, GitLab CI, or even your own PC
This might seem complex, but it’s really just a few steps - let’s walk through the code:
AppVeyor.yml
There are two key bits in the yaml:
environment:
  NuGetApiKey:
    secure: oqMFzG8F65K5l572V7VzlZIWU7xnSYDLtSXECJAAURrXe8M2+BAp9vHLT+1h1lR0
This decrypts our API key and creates an environmental value that we can call in PowerShell as $ENV:NuGetApiKey. Be careful not to display this in any output.
test_script:
  - ps: . .\build.ps1
This runs our build.ps1 file. AppVeyor runs from the project root, so we know the relative path to this script.
Build.ps1
In build.ps1, we use Resolve-Module from Brandon Padgett to pull in dependencies: BuildHelpers, psake, Pester, and PSDeploy:
# Grab nuget bits, install modules, set build variables, start build.
Get-PackageProvider -Name NuGet -ForceBootstrap | Out-Null

Resolve-Module Psake, PSDeploy, Pester, BuildHelpers
Once these are in place, we use Set-BuildEnvironment to create some environment variables for our project. Here’s some example output:
Name                 Value
----                 -----
BHProjectName        psdeploy
BHProjectPath        C:\projects\psdeploy
BHPSModuleManifest   C:\projects\psdeploy\psdeploy\psdeploy.psd1
BHPSModulePath       C:\projects\psdeploy\psdeploy
BHCommitMessage      !Deploy Brandon's changes
BHBuildSystem        AppVeyor
BHBranchName         master
BHBuildNumber        132
You can use these details to simplify the rest of your build code, and to normalize variables across build systems. At the moment BuildHelpers supports AppVeyor, Jenkins, GitLab CI, and VSTS (Thanks Stijn!); pull requests would be welcome.
Lastly, we kick of psake, and if it fails (e.g. a failed test), we exit with a non-zero code to tell our build system that we didn’t succeed.
Invoke-psake .\psake.ps1
exit ( [int]( -not $psake.build_success ) )
Psake.ps1
This is where the real work starts to happen.
First things first, we set up a few variables that we use later - we use $PSScriptRoot if BuildHelpers hasn’t run, set a verbose flag if we see !verbose in a commit message, and run an Init task that doesn’t do much.
Test Phase
Next up we start running some tests:
$TestResults = Invoke-Pester -Path $ProjectRoot\Tests -PassThru -OutputFormat NUnitXml -OutputFile "$ProjectRoot\$TestFile"
If you want a re-usable header for your *.tests.ps1, you can use the output from BuildHelpers to generalize things:
# [Content from *.tests.ps1, not psake.ps1] #
$PSVersion = $PSVersionTable.PSVersion.Major
$ModuleName = $ENV:BHProjectName
$ModulePath = Join-Path $ENV:BHProjectPath $ModuleName

# Verbose output for non-master builds on appveyor
# Handy for troubleshooting.
# Splat @Verbose against commands as needed
$Verbose = @{}
if($ENV:BHBranchName -notlike "master" -or $env:BHCommitMessage -match "!verbose")
{
    $Verbose.add("Verbose",$True)
}

Import-Module $ModulePath -Force
Back in psake.ps1, we check to see if $ENV:BHBuildSystem is AppVeyor, and push up test results if so. This isn’t critical, but it gives us a list of test results on AppVeyor.
Build Phase
After the tests run, we can start a build phase. Not everyone will want to use this, but I like to run two shortcuts:
- Bump the module version
- Update
FunctionsToExport = '*'in the module manifest to include all exported functions
# Load the module, read the exported functions, update the psd1 FunctionsToExport to include exported functions
Set-ModuleFunctions

# Bump the module version
Update-Metadata -Path $env:BHPSModuleManifest
Deploy Phase
Now for the fun part! We deploy the module:
$Params = @{
    Path = $ProjectRoot
    Force = $true
    Recurse = $false # We keep psdeploy.ps1 test artifacts, avoid deploying those : )
}
Invoke-PSDeploy @Verbose @Params
That was a bit anti-climactic! We’ve offloaded all the logic for publishing our module to PSDeploy, leaving us cleaner code.
Deploy.PSDeploy.ps1
We have two deployments in here. If we’re in a recognized build system ($env:BHBuildSystem), in the master branch ($env:BHBranchName), and have a commit message that includes !deploy ($env:BHCommitMessage), we publish our module to the gallery:
Deploy Module {
    By PSGalleryModule {
        FromSource $ENV:BHPSModulePath
        To PSGallery
        WithOptions @{
            ApiKey = $ENV:NugetApiKey
        }
    }
}
This is great, but wouldn’t it be nice to have development builds that folks could test and try out? We can borrow from the PowerShell team’s idea (and code!) of deploying NuGet packages to AppVeyor and add a second deployment - sounds complicated and fancy, but it’s not too bad:
Deploy DeveloperBuild {
    By AppVeyorModule {
        FromSource $ENV:BHPSModulePath
        To AppVeyor
        WithOptions @{
            Version = $env:APPVEYOR_BUILD_VERSION
        }
    }
}
Hit the docs for details on how to install a module published to AppVeyor.
That’s it! We can now install our official module from the PowerShell Gallery, and install development builds from AppVeyor.
What Happens Now?
This whole process sounds complicated, but it’s driven by four generic files you can add or update in your repository: appveyor.yml, build.ps1, psake.ps1, and something.psdeploy.ps1.
Here’s what happens automatically with every commit we push to GitHub:
- GitHub sends AppVeyor a notification of your commit
- AppVeyor parses your appveyor.yml and starts a build on a fresh VM
- build.ps1 installs dependencies, sets up environment variables with BuildHelpers, and kicks off psake.ps1
- psake.ps1 does the real work. It runs your Pester tests, and if they pass, runs PSDeploy against your psdeploy.ps1
That’s about it! Once this scaffolding is in place, you can let GitHub and AppVeyor do the work for you, and start thinking about applying release pipelines like this to your infrastructure!
Rambling Outro: The Gallery
Today, the PowerShell Gallery has fewer than 1,000 modules, many of them focusing on Azure and DSC. Hardly comparable to repositories like CPAN, PyPI, or RubyGems:
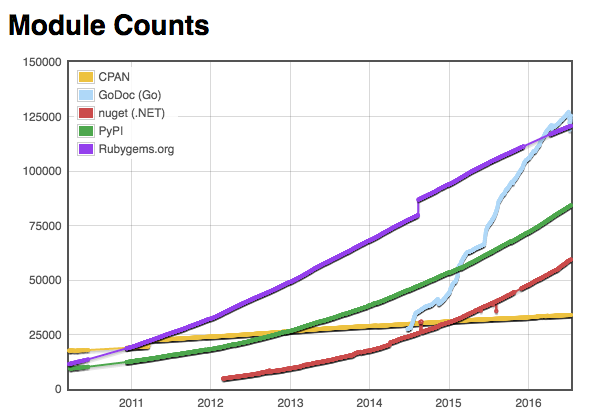
Hopefully we can get to a point where more folks are contributing to the gallery. There are a few things that might move this along:
- Using tools like this pipeline could simplify and automate publication, encouraging lazy folks like myself to use the gallery
- Educating our peers and outdated legal teams on the importance of open source could unlock a trove of internal tools that would be quite valuable to the community. Chef offers a webinar for lawyers; more education targeted at this common road-block-to-sharing might be helpful
- Microsoft could lead by example. Do you see OperationsManager, SqlServer, SqlPs, or Microsoft.SharePoint.Powershell on the gallery?
- You could pester your vendors to distribute modules on the gallery. More should be writing modules, and those that do rarely publish them on the gallery. Props to teams like Amazon’s who already do this
- Open sourcing PowerShell could open the doors to pragmatic OSS contributors who have no motivation to work with an OS-specific language
Cheers!